MaxHire Integration Guide Follow
Welcome to SpringAhead! SpringAhead is a simple, accessible way for you to track your placements’ time and/or expenses. Using the SpringConnect client, you can easily and seamlessly import approved MaxHire data to SpringAhead and your accounting system. This guide covers:
- Initial Setup
- Importing Placements
- Placement Setup
- Advanced Features
- Placement Login Instructions
Initial Setup
MaxHire and SpringAhead seamlessly connect to one another using an Application Programming Interface (API). Simply email support@springahead.com and we’ll take care of this for you.
Importing Placements
- Open SpringConnect
- Click Placements on SpringConnect to open up the placements screen. Once opened, it will display placements ready to be moved to SpringAhead

- The list of all placements that have yet to be exported to SpringAhead will appear:

- Double-click on a line item to bring up the Placement Details screen. Here, all the data to be imported from MaxHire is presented for review. Note that any missing data will be flagged in red. These can be corrected in MaxHire or can be manually added in the next step. The Placement Details screen pulls the data from different sections of the candidate’s Person Window. This is shown below:
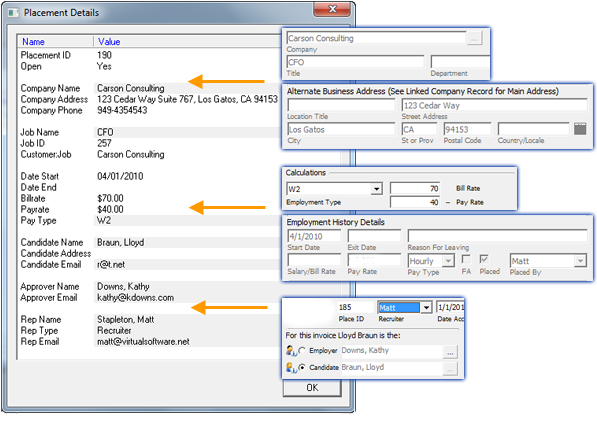
Note that fields in gray can be manually edited here. Simply double click the field on the Placement Details screen and edit it. These changes will flow into SpringAhead and the accounting system, but will not flow back into MaxHire. If you want the data in MaxHire, enter it there directly and refresh the placement list before proceeding.
- The Placement Import menu will allow you to import to QuickBooks, SpringAhead, or both. Check the boxes for all of the line items to import and click Import when ready
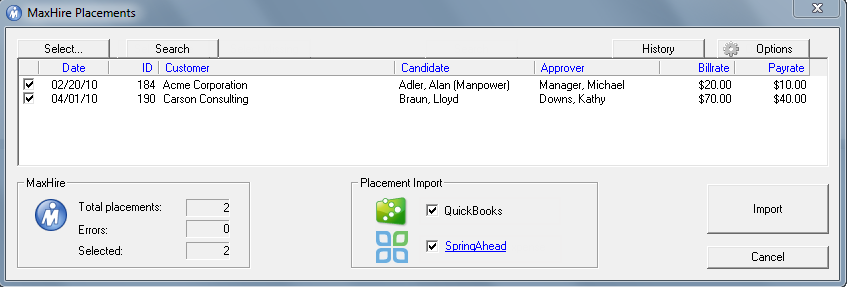
- At this point an Import Successful message should appear. Congratulations! Your data has been successfully imported! Be sure to check your data both in SpringAhead and your accounting system. After you’ve imported your information, you can always check, modify or re-import the information. See the Advanced Features section of the guide for details
Placement Setup
Once you’ve imported the data, SpringConnect will automatically add the information in SpringAhead.
Placements and Approvers
The placements and their approvers will be populated in the People section. Their login names and passwords will be automatically created, enabling them to instantly log in and track their time. Login instructions are defined in the Placement Login Instructions section below.
Jobs
SpringAhead will also populate the jobs the placements are on. These can be found under Projects. If you select an imported project under the project list, it is already configured to have the placement submit time to it and the approver is configured to approve that time.
Advanced Features
To View Previously Imported Data or Re-Import Placements
To view previously imported placements and the data associated with them, click History in SpringConnect’s Placements screen. This will bring up a list of data arranged by the date imported.
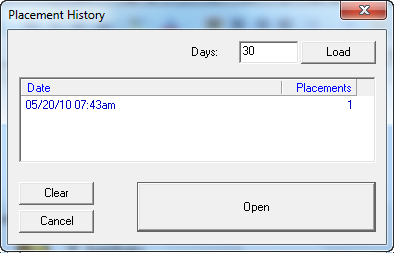
Select the information you’d like to modify or re-import. Once you’ve selected the data it will bring up a placements screen. There, you can modify data or re-import them into SpringAhead or your accounting system.
Moving Placements to History Without Importing Them
If a placement does not need to be sent to SpringAhead or your accounting system, right-click the name of the placement and click Mark as Exported.

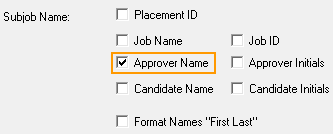
Automatically Create SubJobs
You can create Jobs with Subjobs when importing from Bullhorn. For example, if you would like to create the client in the accounting system with a subjob for each approver, you can do that. Click Options from the Placement screen and then select the appropriate subjob option from the menu:
If you have any questions regarding the settings, please contact support@springahead.com for assistance.
Placement Login Instructions
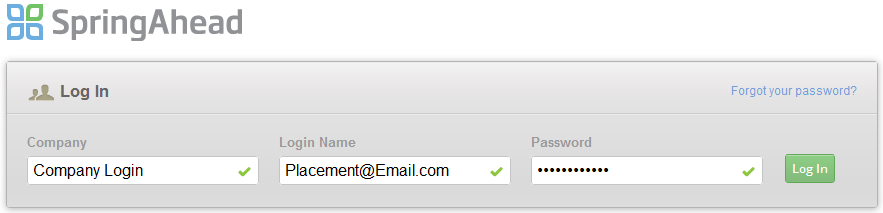
Your placements will automatically have their login name and password created for them:
Login name: Placements’ email (ex: Placement@Email.com)
Password: The text before the ‘@’ symbol (ex: Placement)
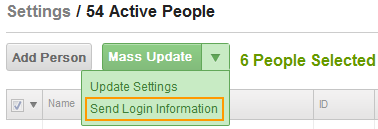
When you’re ready to let the people log into the system, simply send out welcome emails. You can do this as the administrator by logging into SpringAhead and going to your people list. Check off these new users and click on the arrow beside the Mass Update button, and select Send Login Information. This will send your users login information including their user name, password and a link to login.