Administrator's Guide for Basic Setup Follow
In this section, we’ll perform the following:
- Log in to SpringAhead
- Introduce the Navbar
- Review the Settings screen
- Setup basic data
- Administrator setup
- Approver setup
- Employee setup
- Project setup
- Enter a sample time transaction (optional)
- Enter time as an employee
- Approve time as an approver
- Process information as an administrator
The intent of this section is to only cover the basics. Our sample transaction will cover the core processes and give you a good foundation. We will fill in the details over the remainder of the manual.
Logging into SpringAhead
Log into SpringAhead using the link provided in the welcome email. Bookmark the page so you can return to it easily. You can also click the Client Login link at www.springahead.com.
Login to your company by entering the information provided to you:
- Company (not case sensitive)
- User Name (not case sensitive)
- Password (case sensitive)
Introduction to the Navigation Bar (NAVBAR)
Upon logging in, you will see the Navbar:

The Navbar is used to navigate the various modules within SpringAhead. The modules that are available are determined by the access you have been allowed when setting up the user.
Here is a brief description of each of the modules:

Note that a user can have multiple roles. For example, an administrator may be responsible for:
- Entering their own time and expenses (Employee Role)
- Approving time and expenses for others (Approver Role)
- Setting up data (Administrator Role)
As we define access to modules in the following sections, you will see the changes reflected in the Navbar.
The Settings Screen
Click the Settings button on the top right. You will find the Settings list on the left:

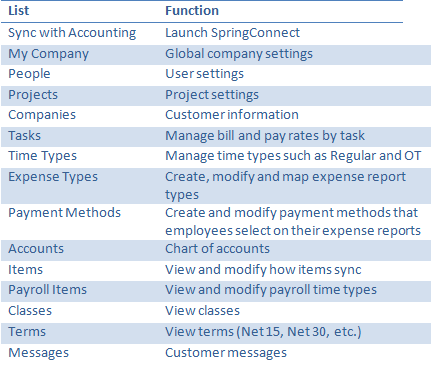
The available lists will change based on your SpringAhead setup. For example, if you disable expenses in My Company, the Expenses tab will not show among the Settings list. You can also enable tasks by going to My Company, under the Defaults heading, check Use Tasks.
User Basics
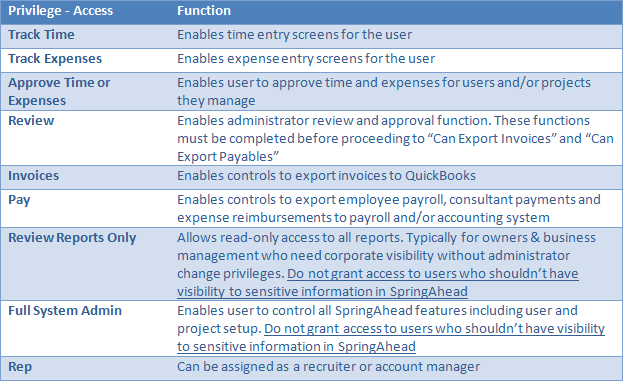
Everyone who logs in to SpringAhead is considered a User. All users have a name, login name, password and email. Each user can have one or more roles within the product. As you give roles to a user, what they are allowed to see and what they can do while using SpringAhead change.
The following roles are available:
User Setup: Introduction
You're now ready to start setting up your team. The process is as follows:
- Set up an Administrator account
- Set up an Approver
- Set up an Employee
- Set up a Project
User Setup: Administrator
Administrators are responsible for managing SpringAhead and moving data to and from QuickBooks. One company may have multiple administrative users. We recommend you create your own administrator account at this time.
To set up your own administrative account, follow these steps:
- Login to SpringAhead as the "Admin" user you were provided
- Click the Settings button in the Navbar on the top right of the screen
- Click on People located on the menu bar on the left
- Find your name
- If your name is not in QuickBooks, then it will not be listed
- To add a new user to QuickBooks and SpringAhead, add the name as an employee in QuickBooks and re-sync the data using SpringConnect
- To add a new user to SpringAhead without creating a new employee in QuickBooks, click Add Person and enter his/her first and last name
- If your name is not in QuickBooks, then it will not be listed
- Within the project, click on the Permissions tab

- Set the Person Type to Internal (In this case, this person is not entering time for themselves and is considered an Internal employee)
- In the Administrator Rights section, select Full System Admin
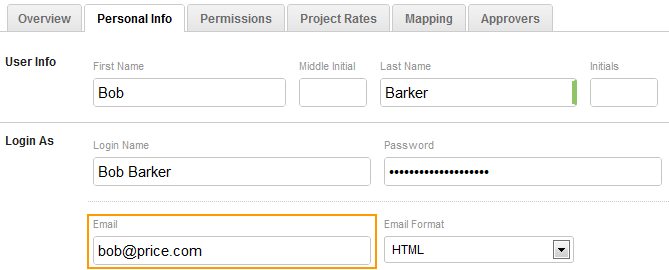
- Confirm the user’s email address in the Personal Info tab
- Scroll down and click Save and Exit
You just set up the basics for the administrator account. You can return to this screen at any time to add or remove access privileges as necessary.
User Setup: Approver
Once time and/or expenses are submitted by an employee, the data will automatically be routed to an approver for review. You can set up any individual as an approver. For example, internal managers, clients or external project managers can all be approvers. Once approved, the information will be passed to the administrator for processing.
To set up an approver:
- Click Settings in the Navbar
- Click People
- Select an individual who will be approving submitted time
- This list was synced from the QuickBooks employee list. If the desired approver is not shown, add the user either by adding the employees to QuickBooks and re-syncing OR
- Click Add Person to add an approver who is not an employee and enter his/her first and last name
- Enter the person’s email address in the Personal Info tab. Leave the Login Name and Password blank. SpringAhead will automatically create them based on the person’s email address
- Set the Person Type. If the approver works for another company, select Client Approver and set the company name from the Customer Name drop-down menu. If the approver is an employee, select Internal
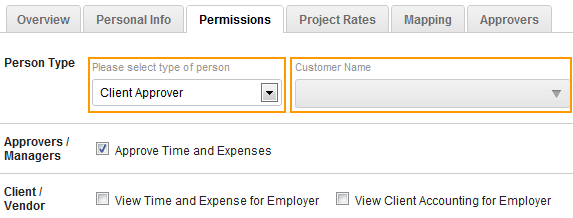
- Grant security privileges to the approver by checking off Approve Time and Expenses
- Scroll to the bottom and click Save and Exit
User Setup: Employee
Users can submit time and/or expenses. Both employees and contracting consultants were imported from QuickBooks when you synced the data. Contractors retained through a Corp2Corp relationship will not appear in the user list and will have to be added. The following steps will guide you through user setup. If the desired employee or contracting consultant for our test transaction does not appear on the list, it is strongly advised that you ensure the individual is in QuickBooks and re-sync before proceeding. This allows you to keep accurate employment records in QuickBooks and ensures the ability to import transactions later.
- Click on Settings, then People on the menu bar on the left
- Select an individual who will have time approved by an approver we've already set up
- If the user works for a Corp-to-Corp
- Click Add Person
- Enter his/her First and Last name
- Select Corp-to-Corp Contractor in the Person Type section
- Select the Employer/Vendor Name using the drop-down menu
- If the user works for a Corp-to-Corp
- Click on the Personal Info tab
- Enter and note the login name and password; we’ll be using it shortly in our test transaction
- Enter their email address (this will be used to create their login information)
- Click on the Permissions tab
- Set the Person Type as either Hourly Employee or Salaried Employee
- Grant access privileges as appropriate, such as Track Time or Track Expense
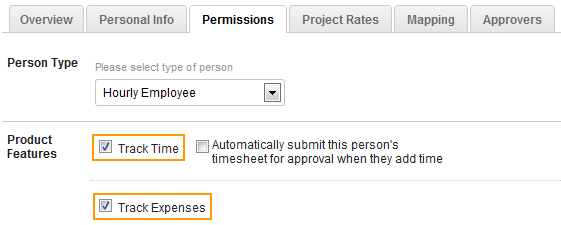
- To set up a manager for the user, click on the Approvers tab. If you are setting up a project/client-based approver, skip this step. If you are setting up a manager-based approver, select the Approver in the Manager field, and toggle Yes for Approves Time and for Approves Expenses

- Click Save and Exit
Role Recap
You now have a sense for the types of roles that individuals can be assigned in SpringAhead. As noted previously, an employee may have multiple roles. Here is a quick recap for your reference:

Project Setup
Now we'll set up a project to submit time to:
- Click on Settings, then Projects
- Click on a project that the employee submits time to – this should have synced from a customer in QuickBooks
- Click on the Details tab. In the Project Dates section, enter the date that employees can start recording time to the project in the From field

- Click on the Time Settings tab. Regular Time is automatically enabled. If you would like to add other time types, click Add Standard Time Types

- If you set up a project/client-based approver earlier, click on the Approvers tab, select the project manager in the Manager field, and toggle Yes for Approves Time. In the event that a Timecard Approver is set both at the Project level and the Employee level, the timesheet will first be routed through the person’s manager then the project manager
- Within the project, click on the People tab. Using the Track time for field, select whether you would like All time users or Only selected time users

- If only selected time users may add time to the project, scroll down to the people section of the same tab, and click Add Person. Select the name of the employee using the drop-down menu. Note that you can leave the Start Date blank here as it will be filled in for you from the project’s start date. You can also see that this is where you may enter rates – for now, let's leave these blank. We’ll cover rates later. Click Add Person when you’re done
- Assigning Users to Projects: By specifying the users that can enter time to a project, you have total control over what jobs each user can submit time and expenses to. This streamlines the data entry process for users, reduces the potential for errors and safeguards your client list. If you would like all of your users to be able to record time to the project and not have to specify each one individually, you can simply select All time users in the Track time for field. This is particularly useful for administrative time and paid time off.
- Click Save and Exit
This completes the simple setup process. Now let's familiarize you with how time is entered, approved, and processed.
SpringAhead Workflow
Here is an overview of SpringAhead's standard workflow:

Note that the workflow moves logically from left to right and that a user type is assigned to each step. We'll now assume each role and walk through a sample transaction from Data Entry to Processing.
Data Entry: Entering Time
To assume the role of the Employee you set up, click on the Home icon:

- Change the person's home screen whom you're viewing:
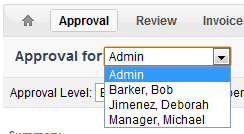
- You will see the employee's home page as if he/she is logged in
- Click Add Time
- You will now see the Time Entry screen

- You will now see the Time Entry screen; it will be defaulted to show in List view
- For our example, let’s view this by week by clicking Week to the right of the screen

- Click on the first Project drop-down and select the project that we set up earlier (if you don’t see it, you might be editing time for earlier than the project’s start date). Note that in the Type pull-down Regular has been selected for you as we have only enabled that type of time
- Enter 8 hours a day for Monday through Friday
- Type This is my test transaction in the memo field
- Click Submit All at the bottom of the page to submit time
Automatic E-Mail Notification: When email notifications are active, submitting a timecard will automatically send an email notification to the appropriate approver as defined by the employee and project settings. The email would be sent to the address shown in the approver’s profile that we reviewed in the previous unit. Since notifications are initially disabled, nothing was sent this time. Once you are through testing your setup and are live with your users, you should enable email notifications as outlined later in this manual.
You'll now see the submitted hours on the home page. These hours are now ready for approval.
Approving Time
SpringAhead makes approving time fast and easy. Simply login, review the pending action items and approve or reject them. Let's continue with the sample transaction:

- Click Approval in the Navbar
- Change the name of the Approval for Admin to the person whom you set up as an approver
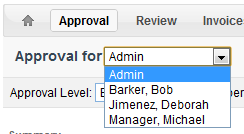
- You'll see exactly what the person you selected will see when they log in to SpringAhead
- Click on the line item to review the details of the timecard
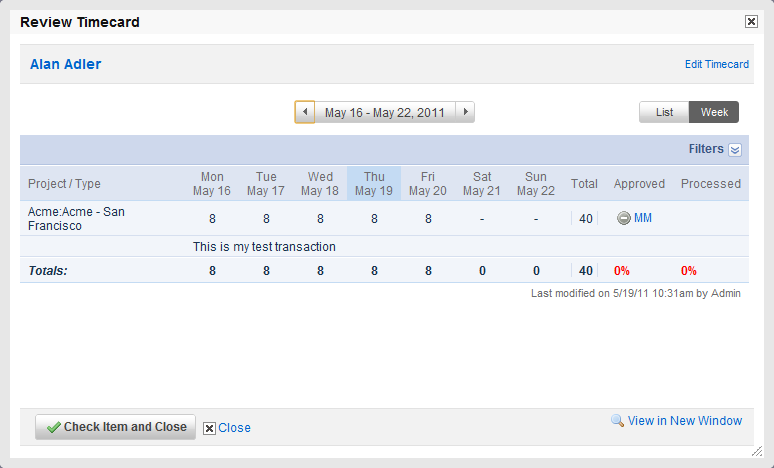
- Note that the memo entry "This is my test transaction" appears here as well as the hours entered
- Click Close to exit the Review Timecard screen
- Check the box to the left of the person's name to select the employee. You can also do this in the detailed timecard screen by clicking Check Item and Close
- Note that Approve is set as the default action
- Click Submit
Key Concept: Note that the approval screen now indicates that there everything has been approved. By removing pending work from the queue as tasks are accomplished, SpringAhead ensures that time and expenses are quickly and efficiently approved and are never lost in the process.
Review
Review is the accounting phase of SpringAhead. In this step, aggregated time and expense data are presented for review and modification before export to QuickBooks. Accordingly, it may be helpful to think of Review as the place to go to see what's been collected so far. Administrators are responsible for the Review Function.
To Review the test transaction:
- Log in as an Administrator
- Click on Review in the Navbar
- In the Timecards area, you will the timesheet you just approved. You’ll also see additional sections for Unapproved Time and Unsubmitted time. All of your timesheets will fall into one of these three categories (approved, unapproved, or unsubmitted)
- We'll now turn our attention to setting up the rates and items taht will complete the setup of our test transaction and clear the error messages you see on this page