DCAA Compliant Settings Follow
This guide details the recommended settings within SpringAhead to assist with your DCAA compliance. Detailed below are four major articles:
- Preparing your Payroll Items in QuickBooks
- Enabling detailed timecard audit
- Enabling daily time entry
- Creating an overhead project for indirect labor (Using QuickBooks)
- Viewing timecard audit history
Preparing Your Payroll Items in QuickBooks
These steps are recommended for proper cost center and labor distribution tracking in QuickBooks.
- Create the following Payroll Items in QuickBooks
- Overhead Labor Codes:
- General & Administrative (G&A)
- Bid &Proposal (B&P)
- Paid Time Off (PTO)
- Research & Development (R&D)
- Direct Labor Codes:
- Direct Labor Government
- Direct Labor Commercial
- Overhead Labor Codes:
- Create custom time types that correspond to these Payroll Items.
Enabling Detailed Timecard Audit
- Log into SpringAhead, and click Settings.
- Click My Company.
- Under the Time header, check Changes Require a Reason (DCAA). Now, whenever a user submits time for a past date or makes changes to a timecard, they will be required to state a reason.
- Click Save.
Enabling Daily Time Entry
- Log into SpringAhead, and click Settings.
- Click My Company.
- Under the Time header, click More Settings.
- Check Use Time In/Time Out.
- Click Save.
Creating an Overhead Project for Indirect Labor (using QuickBooks)
QuickBooks Prep:
The steps below assume you’re using QuickBooks Desktop and QuickBooks Payroll Items, and you need to create an overhead project, a non-billable or indirect labor service item.

- Login to QuickBooks, and open Customer Center.
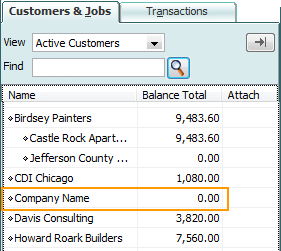
- Create a new customer named after your company.
- Still in QuickBooks, click Lists, then Item List.
- Click Item in the bottom left-hand corner, and click New.
- Create a new item called “Indirect Labor.”
- Open SpringConnect and click Synchronize.
SpringAhead Configuration:
Once synchronized, it’s simple to set up the project.
- Click Settings, then click My Company.
- Under Timecard Payroll Items and Codes, assign the appropriate payroll items, and click Save.
- Click Projects on the left-hand menu.
- Click on the project you just created (Company Name).
- Within the project, click on the Time Settings tab.
- In this area, you can add or remove any time types.
- Click on the Invoicing tab within the project.
- In the Invoice Item drop-down, assign the newly created item (Indirect Labor).
- Within the project, click on the People tab.
- In the Track time for field, select All time users or Only selected time users and assign users to the project.
- Click Save and Exit.
Viewing Timecard Audit History
- In SpringAhead, click Reports.
- Run a Time by Employee or a Time by Project report. Check Include Details.
- On a generated report, you'll see weeks broken down. Click on the blue date link to view the timecard.
- In this new pop-up, click View in New Window near the lower right.
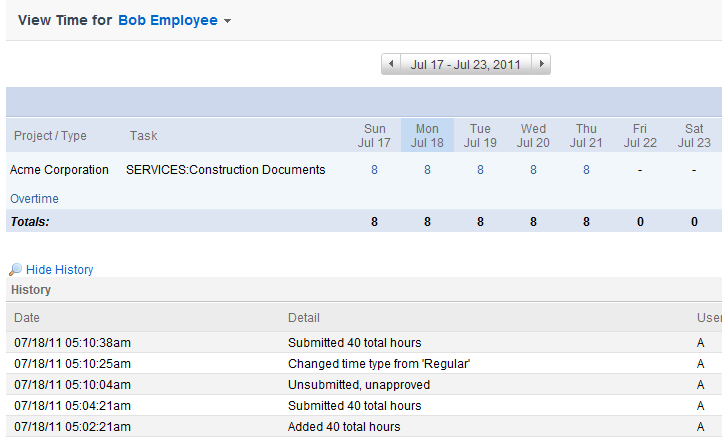
- At this screen, click Show History on the lower left.
- You’ll now see the detailed history of the timecard.
