Configuring Reps Follow
Reps is an abbreviation for for Sales Representatives. By assigning a sales rep to a user or a project, the person will be able to:
- View timesheets for users or projects they are associated with.
- Run the Time by Rep report. They will only see information that relates to their users / projects.
- Rep names can be exported to invoices.
- Commission rates can be added by Rep, by Project, or by Person.
Rep settings can be set at the user level or at the project level. Reps set at the project level can see time data for that project. Reps set at the user level can see all of that user's data across the projects they work on.
Reps per person are disabled by default. Follow these steps to enable Reps:
- Log in as an administrator.
- Click My Company.
- Check Use User Reps in the Defaults heading.

- Click Save.
To indicate which users are reps:
- Go to Settings, and click on People.
- Select a user you want as a sales rep (Click Add Person to add the individual, if necessary. If they are an employee in QuickBooks, they will be in the list already).
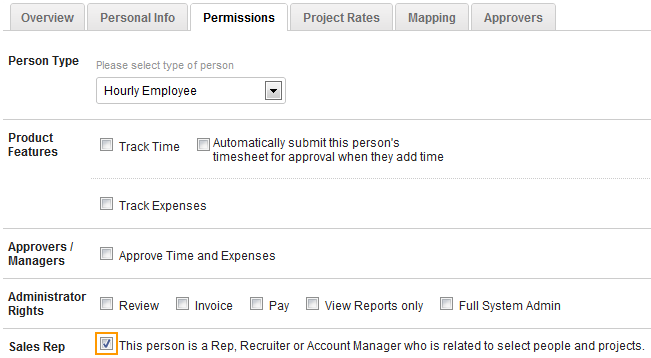
- In the Permissions tab, check This person is a Rep... in the Sales Rep section.

- Click Save and Exit.
- Repeat as necessary for other users.
To set a rep by user:
- Go to Settings, and click on People.
- Select the person to assign a rep for.
- In the Approvers tab, in the Reps section, click Add Rep and select the name of the rep from the Rep Name drop-down list.

- Select the Rep Type (see 'Rep Types' below for details).
- Click Add and then click Save.
To set a rep by project:
- Go to Settings, and click Projects.
- Select the project to assign a rep to.
- Within the project, click on the Approvers tab. Click on Add Rep in the Reps section, and select the rep from the Name drop-down list.

- Enter the date range this rep is valid. If left blank, it will be the project's date range. The end date can be left blank.
- Select the Rep Type (see 'Rep Types' below for details).
- Click Save.
Rep Types
There are three Rep Types: Account Manager, Recruiter and Other. All three function the same with the exception of how they are exported to QuickBooks.
- Account Manager: This type is exported on each customer invoice "Rep" field as initials
- If you want reps exported with their full names, go to My Company. Under the Invoicing heading, change the Rep Format to Full Name
- Recruiter: This type is not exported by default. You can export them in one of two possible fields on each customer invoice fields: Other or Ship Via. This is selectable using the My Company, under the Invoicing heading, drop-down menu Export 'Recruiter' column ('LN, FN'). As noted you have no choice for the format, and it will be "Last Name, First Name"
- Other: This type is not exportable. Use this type to add reps for SpringAhead only, assuming you want other rep types to be exported.
Exporting the Rep's Name to QuickBooks Invoices
To include the rep's name on invoices exported to QuickBooks, perform the following:
- Click Settings.
- Click My Company.
- Select the QuickBooks invoice field to export to.
- Click Save.
To ensure that the reps' names appear on invoices, be sure to use a QuickBooks invoice template that includes the field that rep names are being exported to.
Notes
Reps are generally set up as employees or vendors in QuickBooks. If a rep is an employee, then simply set it up as you would an employee in QuickBooks, and as a contractor if the rep is a vendor.
If a rep is neither of these, then you can enter them into the Other Names List by going to the Lists tab, then Customers & Vendor Profile Lists, then Sales Rep List, and adding a new sales rep.
If the sales rep was added as an employee or vendor, then after running SpringConnect, they should be set up in SpringAhead the same way they would regularly except they should only be given the Can be Rep privilege.